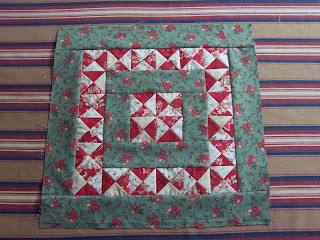
Blogger Girls Block of the Month Block 5
Happy May Day! Does anyone celebrate that anymore? I have a picture of my mom when she was little in her May Day dress. So Cute!
Well, it's time for the next block. You are in luck, this month we are doing 3 blocks. If you did the math, there are actually 13 blocks instead of 12 so I had to triple up on one of the blocks. It happens to be Denise's block because it was so versatile! I did change one part of her block for the 3rd version to add some interest to it. Click here to download instructions: Block 5.
First, make your 1/2 square triangles. Square to the correct size. Note that you will make 2 of each color and you will only need 1 so you can save them or use them for another project.
The trickiest part of the block is making sure that you have your flying geese made with the correct dark on the correct side. There are 4 different flying geese and you make 2 of each. Make sure that you follow the diagrams to make sure you have them correct.
As before, make sure to trim them using the Mini Fit to be Geese.
Sew together in 3 rows. Press per directions.
Here is the completed block:
Here is Version 2:
For the third version, you will need to make a combination unit. Here is how you make them.
Start with 2 rectangles and 2 squares per measurements given. Sew them together as shown. On the back seam, in the center, clip into the seam 1/4" and press one up and one down.
Next, draw 2 diagonal lines at a 45 degree angle going through where the seams cross. Do not go from corner to corner!
Place the drawn piece on a rectangle of main background, right sides together. Sew on the lines. Cut 1/4" inside the lines.
Press towards the main background and square to 2 1/2". Square by lining up the 2 1/2" diagonal line on your Fit to be Quarter 6.5 along the diagonal seam of the block. Also, line up the 1 1/4" lines on the square. Trim.
Rotate, line up on the 2 1/2" lines and trim. Make 4.
Make your flying geese and sew the block together as shown.
You are done with block 5's!
See you next month.
Well, it's time for the next block. You are in luck, this month we are doing 3 blocks. If you did the math, there are actually 13 blocks instead of 12 so I had to triple up on one of the blocks. It happens to be Denise's block because it was so versatile! I did change one part of her block for the 3rd version to add some interest to it. Click here to download instructions: Block 5.
First, make your 1/2 square triangles. Square to the correct size. Note that you will make 2 of each color and you will only need 1 so you can save them or use them for another project.
The trickiest part of the block is making sure that you have your flying geese made with the correct dark on the correct side. There are 4 different flying geese and you make 2 of each. Make sure that you follow the diagrams to make sure you have them correct.
As before, make sure to trim them using the Mini Fit to be Geese.
Sew together in 3 rows. Press per directions.
Here is the completed block:
 |
| Block 5 Version 1 |
 |
| Block 5 Version 2 |
Start with 2 rectangles and 2 squares per measurements given. Sew them together as shown. On the back seam, in the center, clip into the seam 1/4" and press one up and one down.
Press towards the main background and square to 2 1/2". Square by lining up the 2 1/2" diagonal line on your Fit to be Quarter 6.5 along the diagonal seam of the block. Also, line up the 1 1/4" lines on the square. Trim.
Rotate, line up on the 2 1/2" lines and trim. Make 4.
You are done with block 5's!
See you next month.


Comments
www.n8fan.net