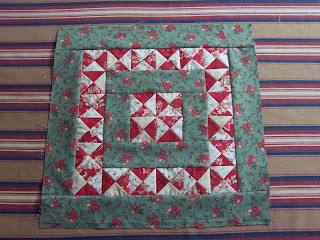
Blogger Girls Block of the Month Block #2
Can you believe it's been a month since the last block?! Well, it's February 1st and it's time for block # 2. Hope everyone is enjoying the block of the month and checking out both flickr and the other participants. Just as a reminder, here they are:
Sherri from A Quilting Life - aquiltinglife.blogspot.com
Thelma from Cupcakes ‘n Daisies ~ cupcakesndaisies.blogspot.com
Lissa from Moda Lissa ~ ModaLissa.blogspot.com
Denise from Quilter’s Window ~ Quilterswindow.com/blog/
Nicole from Sister’s Choice ~ sisterschoice.typepad.com
Lisa from Stashmaster ~ The-Stashmaster.blogspot.com
Here is Block #2, version 1 using Royal Gardens:
Here is Block #2, version 2 using Royal Gardens:
The first thing to do is to make 1/2 square triangles. I make them by drawing a diagonal line on the back of the light from corner to corner. Then I place the light on the dark and sew 1/4" out from the center line. Cut on the line, press towards the dark and square to the correct size using the Fit to be Quarter 6.5 ruler. I like to oversize my pieces so that I can square them up to the right size.
Next, sew these pieces to the rectangles of light that you have cut. Rotate the resulting pieces and sew together. Clip the piece in the center on the back 1/4" in to the seam so that you can press one side up and one side down. I picked up a handy little pair of scissors at my friend, Denise's shop, Quilter's Window. They are called Marry J's Original 1/4 Quilters. They are super cool and clip right to the seam at 1/4".
On the back of the piece, draw a 45 degree angled line from the top left corner to the bottom right but not in the corner. It will be in about 1/2" from the end. Make sure that you watch where your seams cross on the 1/2 square triangle. Place the marked piece on the rectangle of the other dark. Sew on the drawn line, cut a 1/4" in from the line and press towards the other dark.
Sew the triangles cut from the background as shown. Trim even to make another triangle.
Sew the large triangle to the piece and press. Square to the correct size.
Draw a diagonal line on the back of the remaining squares of the darks and place on the piece you just made. Sew on the drawn line, cut to 1/4" and press. Repeat to make 4 units with opposite darks on each other. Note on the sample below, I am showing the reverse as the above samples.
Sew the 4 units together to make your quilt block and there you go: Block #2!
Here is Version 2 made by my friends Kathy:
Make sure that you check everyone's blog out and also the blocks on flickr. Enjoy and have a great time working on your blocks!


Comments
Thanks for the block.
Saskia
Gail
By the way, just LOVE these and am looking forward to this as my next project. Thank you!